A month has gone by and nice new activities involving minis have ensued. Now that I participate of CDHM's forum I have undertaken participation in their workshops quite methodically. I am also taking classes on cold porcelain with Ernesto Baldini and little by little I am gaining confidence in modelling.
jueves, 4 de junio de 2009
De vuelta / I'm back
Ha transcurrido un mes y muchas nuevas actividades relacionadas con las minis. Ahora que estoy en el foro de CDHM me he dispuesto a realizar más metódicamente sus talleres. También estoy tomando clases de porcelana en frío con Ernesto Baldini y poco a poco voy perdiendo el miedo a modelar esta pasta.

A month has gone by and nice new activities involving minis have ensued. Now that I participate of CDHM's forum I have undertaken participation in their workshops quite methodically. I am also taking classes on cold porcelain with Ernesto Baldini and little by little I am gaining confidence in modelling.
sábado, 11 de abril de 2009
Pantallas / Lampshades
Con la ayuda del tutorial de Pat Carlson (http://www.cdhm.org/tutorials/making-miniature-lampshade.html) realicé algunas pantallas y pude terminar de armar una lámpara. Esta funciona gracias a la clase que Olga nos dio, en la cual nos enseñó a soldar los cables en la bombita. Y la base es un regalo de Lily, realizado en porcelana china para lámpara

Thanks to Pat Carlson's tutorial (http://www.cdhm.org/tutorials/making-miniature-lampshade.html) I made some lampshades and I managed to assemble a lamp. It works thanks to the instructions given by Olga in class. She taught how to solder wires on the bulb. The base is a present from Lily, who made it in china to serve as a lamp.
Limo Fimo
No me he llevado bien con estas pastas pero algunos intentos con porcelana en frío modelando flores con Ernesto Baldini me fueron dando confianza y ahora participé en dos talleres de CDHM (forums.cdhm.org/). Con la ayuda de fotos y breves instrucciones que muestran paso a paso la ejecución de un objeto llegué con éxito al producto final.


I never got along very well with clays but I had a try with cold porcelain modelling flowers with Ernesto Baldini, which gave me some confidence. Now I took part in a couple of workshops given by CDHM (forums.cdhm.org/). With the help of pictures and brief instructions that show you step by step, how to make an object I reached the final product successfully.

I never got along very well with clays but I had a try with cold porcelain modelling flowers with Ernesto Baldini, which gave me some confidence. Now I took part in a couple of workshops given by CDHM (forums.cdhm.org/). With the help of pictures and brief instructions that show you step by step, how to make an object I reached the final product successfully.
domingo, 22 de marzo de 2009
Estilo moderno / Modern style
En esta mesa busqué principalmente poder ensayar una nueva pátina para dar terminación a fibrofácil. La combinación de una falsa malaquita con bordes al tono dieron como resultado una mesa moderna.

In making this table I tried mainly a new finish for MDF. The combination of false malachite and borders matching the colour gave as a result a modern table.
Etiquetas:
malaquita malachite acrylic paint wax
Curvas / Curves
Siempre me fascinaron los muebles curvos, más por la curiosidad de hacerlos que por gusto. Ahora probé con fibrofácil, cortando para marco y puerta 2 piezas de fibrofácil de 1 mm de espesor. Las superpuse y las sujeté alrededor de una lata de durazno con bandas elásticas y tiras de algodón para sujetarlas firmemente. En efecto, se curvaron.

Curved furniture has always fascinated me, not so much for the look of it but for challenge of making it. Now I tried with MDF, by cutting out the frame and the door, twice, in a 1 mm board. I put one on top of the other and fastened them round a tin of peaches, securing them with elastic bands and tighteneing them with pieces of cloth. The result was the desired curving.
Etiquetas:
curvas curves furniture italian style paint
sábado, 21 de marzo de 2009
Potes y bols / Pots and bowls
El tutorial de Chantal en Miniaturellement (http://cramaillotte.kazeo.com/Trucs-et-techniques-perso/Saladiers-ou-autres-en-platre,a573674.html) me motivó para realizar estas vasijas. Sin embargo, mis primeros intentos fracasaron. Como no conocía la densidad que debía darle al yeso Paris, el material se acumuló sobre una mitad de la huevera. Tras las sugerencias de Proppy, procedía a insertar una huevera dentro de otra para que las vasijas tuviesen un espesor parejo. Así resultó. Las primeras, fueron ahuecadas con Dremel, lo cual pone a cualquiera bajo un manto de polvo níveo. Las otras fueron mejoradas con lijas.
Para pintarlas se las cubrió con acrílico directamente o con una base de sellador. En este caso, el sellador forma una película y los colores no cubren en forma total. Por se motivo se utilizaron efectos de pátinas doradas o plateadas.

Chantal's tutorial in Miniaturellement (http://cramaillotte.kazeo.com/Trucs-et-techniques-perso/Saladiers-ou-autres-en-platre,a573674.html) motivated me for the making of these pots. However my first experiments were an absolute failure. As I did not know about the exact texture of this plaster, the material accumulated on one side of the egg box. Following Proppy's suggestions I inserted one side of the box on top of the other so that the pots would have similar thickness. It worked. the first pots were thinned out with Dremel, which spreads white dust all over you. The others were finished with regular sanding.

I did the painting with acrylic paint or by using water varnish first. In this case, the varnish forms a protection layer so the acrylic paint does not fully cover the surface. To remedy this I made use of gold and silver finishes.
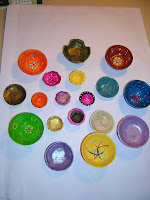
Para pintarlas se las cubrió con acrílico directamente o con una base de sellador. En este caso, el sellador forma una película y los colores no cubren en forma total. Por se motivo se utilizaron efectos de pátinas doradas o plateadas.
Chantal's tutorial in Miniaturellement (http://cramaillotte.kazeo.com/Trucs-et-techniques-perso/Saladiers-ou-autres-en-platre,a573674.html) motivated me for the making of these pots. However my first experiments were an absolute failure. As I did not know about the exact texture of this plaster, the material accumulated on one side of the egg box. Following Proppy's suggestions I inserted one side of the box on top of the other so that the pots would have similar thickness. It worked. the first pots were thinned out with Dremel, which spreads white dust all over you. The others were finished with regular sanding.
I did the painting with acrylic paint or by using water varnish first. In this case, the varnish forms a protection layer so the acrylic paint does not fully cover the surface. To remedy this I made use of gold and silver finishes.
Etiquetas:
Paris plaster,
Potes y bols,
pots and bowls,
yeso
Combinando fibrofácil / Combining MDF
Con un sencillo tutorial pude combinar el uso de fibrofácil y varillas de madera para dar un acabado de mueble fino a una mesa baja. Las patas cabriolet están torneadas con Dremel, limas de metal y de uñas y mucha lija. El acabado fue realizado con pintura acrílica y barniz al agua y lustre final en cera.

With the help of a simple tutorial I managed to combine MDF and wood strips so that this low table would look refined. The cabriolet legs were shaped with Dremel, metal and nail files and a lot of sanding. The final finish was made with acrylic pain and water varnish and the last touches with wax polish.
Etiquetas:
mesa baja cabriole table fibrofacil MDF
Suscribirse a:
Entradas (Atom)